Table of Contents
Have you wondered how to change battery in Glass Break Sensor? Yes, as a homeowner there are specific procedures for changing the battery in your glass break sensor may vary depending on the model.
Few months ago, I startled awake by the beeping of a low battery warning from your home security system?
That sinking feeling as I realize my home is vulnerable without a functioning alarm?
I learned the hard way after a glass break sensor died, leaving a window unprotected for weeks.
After that incident, I decided to take control and learn how to safely change the batteries in my home security system.
Now I can keep all my sensors in working order and have peace of mind knowing my home is fully protected.
In this article, I’ll explain the step-by-step process to change glass break sensor batteries yourself and share tips to make the job easier.
Let’s get started!
Overview of Glass Break Sensors
Before looking at how to change the battery, let’s review what glass break sensors are and how they work.
What is a Glass Break Sensor?
A glass break sensor listens for the specific sound frequency of breaking glass. It is designed to detect the shattering of windows, doors, and other glass entry points.
When the sensor picks up glass breaking, it sends a signal to the control panel to sound the alarm siren and notify the monitoring center.
This alerts you and authorities to a potential break-in.
How Does it Work?
Glass break sensors use a microphone to “listen” for certain sound frequencies.
When glass breaks, it produces very specific frequency patterns. The sensor recognizes these patterns and knows glass has been shattered.
Most quality glass break sensors can detect the sound of breaking glass up to 25 feet away.
They use digital signal processing to filter out false alarm triggers from other sounds.
Where are They Installed?
Typical installation locations include:
- Windows
- Glass entry doors
- Glass patio doors
- Glass portions of front doors
- Glass sidelights around doors
The best placement is on the ceiling across from the protected glass. The sensor must have an unobstructed “line of sight” to detect the breaking glass sound.
Key Benefits
- Provides early detection of an intruder breaking a window or glass door to enter.
- Triggers alarm before intruder gains entry so police can be dispatched.
- Sensor technology minimizes false alarms from other glass sounds like dishes breaking.
- Easy for homeowners to replace battery when needed.
Now that you understand how glass break sensors work, let’s look at the steps for replacing the battery.
How To Change Battery In Glass Break Sensor
The battery replacement process only takes a few minutes. With the right battery and screwdriver on hand, you can swap out the battery and be back up and running quickly.
Supplies Needed
- Replacement security system batteries – Often 9V or CR123A batteries. Check your system specs to verify.
- Small screwdriver – Phillips or flathead depending on sensor.
- Flashlight – Helpful for looking at battery contacts.
- Ladder – If sensor is mounted in a hard to reach spot.
7 Steps To Take On How To Change Battery In Glass Break Sensor
- Locate the sensor – Glass break sensors are typically mounted on the wall or ceiling around the protected window or door. Locate the sensor that needs a new battery.
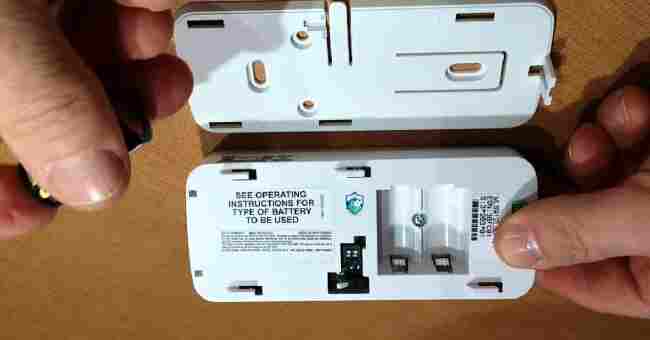
- Open the sensor cover – Use the screwdriver to remove the screw and open the sensor cover to expose the battery compartment.
- Remove old battery – Take out the discharged battery from the compartment. Note the polarity of how it was installed.
- Inspect contacts – Check that the battery contacts in the compartment are clean and corrosion free. Use a flashlight to look closely.
- Install new battery – Place the new battery into the compartment matching the polarity of the old battery.
- Replace cover – Carefully replace the sensor cover and screw it back into place with the screwdriver.
- Test operation – Walk test the sensor by having someone tap on a piece of glass to mimic breaking. Confirm that the alarm triggers when you do this which verifies that the sensor is working again.
That’s all there is to it! Swapping out that dead battery brings your glass break sensor back to life keeping your home protected.
Tips for Maximizing Battery Life
To avoid frequent battery changes, here are some tips to help your glass break sensor batteries last longer:
- Use name brand alkaline batteries rather than cheap generics. They typically last 3-5 years.
- Enable battery-saving modes if available. Some sensors have a setting to use less power.
- Ensure contacts are clean. Corrosion can drain the battery early.
- Keep batteries out of extreme hot or cold. Temperature extremes reduce battery life.
- Test sensors annually. Catching a low battery early allows time to replace.
- Replace batteries proactively every 2-3 years. Don’t wait until it dies.
Signs Your Sensor Battery is Dying
Watch for these signs that your glass break sensor battery needs replacement:
- Beeping sound from the sensor at regular intervals – This low battery indicator is common.
- Sensor stops working or triggering alarms – The battery is completely dead.
- Intermittent false alarms – As the battery gets very low, the sensor can get “glitchy” and cause false alarms.
When you notice any of these, replace the battery immediately to maintain protection. Waiting too long risks the battery dying completely leaving you vulnerable to break-ins.
Tips for Hassle-Free Battery Replacement
Replacing batteries in glass break sensors isn’t difficult, but following best practices makes the process smoother:
- Set a reminder to check batteries every 6-12 months so they don’t die
- Have fresh spares ready to install for uninterrupted protection
- Use name brand alkaline batteries for longest life
- Never mix old and new batteries together
- Dispose of used batteries properly at recycling centers
Keeping backup batteries on hand makes the swap easier when your sensors alert low power.
Glass Break Sensor Battery Replacement Costs
One of the benefits of DIY battery replacement is avoiding the labor costs of a service call.
Professional monitoring services typically charge $50-$100 per sensor. Just the battery usually runs $5-$15.
Doing it yourself saves paying for the technician’s drive time, hourly rate, and trip fee.
Even if you have a monitoring company, you can save money by changing security system batteries on your own.
Here is a cost comparison:
| Battery Replacement Method | Typical Cost |
|---|---|
| DIY | $5-$15 per battery |
| Professional Installer | $50-$100 per sensor |
Replacing security system batteries is simple and fast. With the right batteries on hand and a few basic tools, you can swap out the dead battery and keep your sensors fully functional.
Additional Glass Break Sensor Battery Tips
Now that you know the basics of how to replace batteries in glass break sensors, let’s go over some additional tips for maximum performance and battery life.
Use Exact Replacement Batteries
It’s important to use the exact replacement batteries specified for your system.
Match the voltage, battery chemistry, and form factor. Using cheaper generic batteries or substituting a different voltage or type can lead to a shorter lifespan or operational issues.
Stick with name brand alkaline batteries from brands like Duracell or Energizer for best longevity – up to 5 years of service.
Lithium CR123A batteries also provide excellent longevity in sensors.
Here are some battery tips for common sensor types:
- 9V alkaline – The most popular replacement battery. Use 9v alkaline only, not carbon zinc. Look for max shelf life.
- CR123A lithium – Long 10-year shelf life. Ideal replacement for smoke detectors too. Buy name brand batteries made in USA or Japan.
- Proprietary batteries – Some systems use proprietary custom batteries. Only use exact replacement ordered from the monitoring company.
Using the manufacturer recommended replacement batteries ensures your glass break sensors continue working as intended.
Have Spare Batteries On Hand
It’s smart to buy replacement security system batteries in multi-packs and have extras on hand for when one goes dead.
That way you can quickly swap it out without running to the store. Check all your sensors periodically and stock up on the needed battery types.
Optimal battery inventory:
- Know which batteries each device needs – Review sensor specs and take note.
- Buy multi-packs – Costco, superstores, or Amazon are great sources for multi-packs.
- Have minimum 6-12 spare batteries – Enough for all sensors and some extras.
- Rotate stock – When you replace a battery in a sensor, add the old battery to your spare supply.
- Store properly – Keep in a cool, dry place in the original packaging.
Being prepared with backup batteries ensures you can do a quick swap when that low battery beep sounds. You’ll minimize the time any sensors are inactive.
Perform Regular Sensor Tests
Besides waiting for the low battery warning, periodically test your glass break and other security sensors.
This ensures they are working properly and alerts you to any sensors with low range or signals.
Conduct walk tests seasonally such as:
- Open/close each protected door/window to confirm alarm triggers.
- Walk in front of motion detectors and confirm alarm activation.
- Tap glass with specialty tool or spoon to test glass break sensors.
- Press panic buttons and confirm alarms.
- Open the control panel and ensure correct status lights.
Routine testing discovers any sensors that need battery replacements or have signal issues. This allows you to address problems proactively before a failure.
FAQs about Glass Break Sensor Batteries
Let’s review answers to some frequently asked questions about glass break sensor battery replacement.
How Often Do The Batteries Need Replaced?
Most glass break sensors will operate for 2-5 years on a set of batteries. High quality alkaline batteries will last the longest – up to 5 years.
To maintain protection, proactively replace batteries every 3 years.
Where Can I Buy Replacement Batteries?
You can pick up replacement 9v, CR123A, or other security sensor batteries from most hardware stores, home centers, electronic stores, or online at Amazon.
Buying a multi-pack can save money and ensure you have spares ready.
What Battery Voltage And Type Do I Need?
Check your system manual or spec sheet to verify the exact battery model needed.
Common types are 9v alkaline batteries or CR123A lithium batteries. Match the voltage and battery type already in the sensor.
Do I Need a Service Call To Replace Batteries?
You can absolutely replace weak batteries yourself rather than paying for a service call.
Just follow the battery replacement steps above. It’s a great way to save money on maintenance.
How Can I Test The Sensor After A Battery Change?
Walk test the sensor after replacing the battery. Have a helper tap a piece of glass with a spoon or tapper to mimic breaking glass.
Confirm that the tapping triggers the alarm indicating that the senor is working properly again.
Replacing low batteries in glass break sensors is an easy DIY project. Follow our guide above to complete the battery swap quickly and restore your system to full security.
Key Takeaways on Changing Glass Break Sensor Batteries
Changing the batteries in glass break sensors is fast and easy to DIY. Here are the key takeaways:
- Purchase replacement 9v or CR123A batteries matching your existing sensors. Alkaline batteries last the longest.
- Open sensor cover with screwdriver, remove old battery and insert matching new battery observing polarity.
- Inspect battery contacts for corrosion before installing new battery.
- Test sensor by having helper tap glass after battery change to confirm proper operation.
- Replace batteries proactively every 2-3 years for best performance.
- DIY battery replacement saves $50-$100 in labor charges compared to a service call.
- Watch for low battery warnings like beeping, false alarms or stopped working to know when to change battery immediately.
- Use quality alkaline batteries and enable battery saver modes to maximize battery life up to 5 years.
Following these battery replacement best practices ensures your glass break sensors remain fully functional for maximum home protection.
Know Your Security Company’s Policies
If you use a monitoring service, understand their policies, warranties, and fees related to sensor battery replacement.
Questions to ask:
- Do they provide free battery replacement as part of monitoring plan?
- Is there a trip charge, hourly rate, or mileage fee if they replace it?
- How long is warranty period for their labor and batteries?
- What happens if you DIY replace batteries instead? Does it void warranty?
Knowing the company’s policies allows you to make the most economical choice between DIY battery replacement and using their service technicians.
Changing the batteries in glass break and other security sensors is fast and easy with the right techniques.
Follow this guide and you can keep all your sensors in peak working order for maximum home protection and peace of mind.
Conclusion
Now that you have learned about changing the battery in a glass break sensor is crucial for maintaining your home’s security.
Always remember to use the specified replacement batteries, testing the sensors regularly, and having spare batteries on hand.
Follow the step-by-step process to safely remove the old battery and install the new one.
With some basic supplies and a few minutes of time, you can easily swap out the battery yourself.
Doing it yourself saves the cost of a service call. Take control of your home’s security by learning how to replace batteries in glass break and other security sensors.
Your home will remain protected against intruders.


